Celtic knotwork design 4: BREAKS MAKE PATTERNS
Interlace all done? Time for a break.
No, not the tea-and-biscuits kind of break!
A ‘break’ is what makes fancy Celtic knotwork design out of plain weaving. Plain interlace does decorate calligraphy nicely, but when you add breaks it becomes much more exciting.
A break is like a short wall or barrier introduced into the interlace pattern. It is shown during your drawing process by a line that is at least one whole square long in the grid of squares. The cords which encounter this break-line in the pattern cannot cross it. Like thwarted worms encountering a stone in the earth, they are obliged to turn aside:
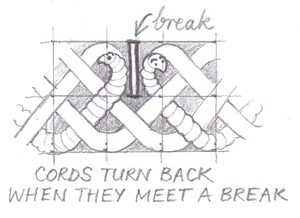
Where the cords turn, they also meet each other, and then they join to form a closed loop. Various combinations of these side-turns, new joins and loops create the attractive patterns or knotwork which are so characteristic of Celtic design.
Here's another illustration below. Look carefully in the middle and you can see a vertical break line. It's repeated three units to the right. The cords in between, rejoining themselves, form a pleasing figure-of-eight pattern that repeats as often as the vertical breaks continue to be added.
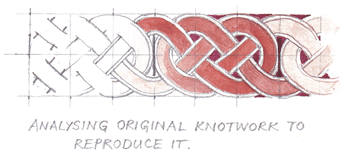
The idea of the break-line is also the basic principle of joins make knots. Remember the half-squares you introduced earlier, at the sides of the panel, as spaces in which to join the ends of cords? The edges of those half-squares are ‘breaks’. The cords encounter these breaks, turn round and join with their neighbours to re-enter the interlace and seal the knot.
Similarly, when you link cords by drawing curves between the basic units, you are making the cords approach the edge of a pattern and then ‘bounce’ off it so they flow back into the weave.
In just the same way, as shown above, you make cords form a decorative Celtic knotwork design inside your interlace by adding an internal break which forces the interlace to turn or deflect, merge into its neighbour and so weave its way back in and round by a new route.
How to include breaks to make a Celtic knotwork design
Warning: there are any number of ways to add breaks wrongly so you end up with a muddle of loose ends and cats’ cradle. Not that I would discourage experimenting with it! But by following two very simple rules, you will save time, effort and paper, and also learn how to draw a Celtic knotwork design which looks authentically good.
• A break-line positioned on the edge of a square (ie directly on top of a grid-line) must start and stop half-way into a square (ie between grid-lines).
• A break-line positioned in the middle of a square (ie halfway between grid-lines) must start and stop on the edge of the next square (ie at the next grid-line).
Here is an illustration:
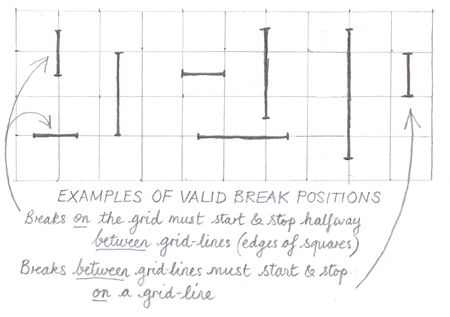
If you think about it you will see that these half-squares are necessary so that there is always a space for the cords to manoeuvre around in. That way they can join up and keep flowing along the pattern.
Of course if you draw a break-line from top to bottom of your knot space, you will separate entire sections from each other. Then you will end up with a series of separate knots sitting next to each other – if that's what you want.
All the above breaks and anything similar will work in a pattern – so long as too many breaks aren't used and they aren't too randomly placed. (Even then, you'll get some interesting effects.)
Below are examples of wrongly positioned breaks which won't work to produce good Celtic knotwork design. They all disobey the above rules:
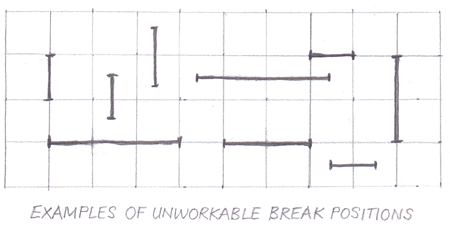
By the way, if you want two break-lines to meet, then one must be on a grid-line (edge of a square) and the other in between.
Here’s another useful tip: use a repeating pattern of breaks and don’t crowd too many in, or else you will lose the regular ‘woven knots’ effect.
Let’s turn to the example knot and see how a simple break pattern works there to give it that 'croissant' shape, like a fancy belt-buckle:
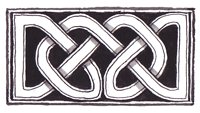
(By the way, the above knot is found in the Book of Kells and other traditional Celtic knotwork designs on stone monuments, etc.)
See how there seems to be just one central knot there, a rounded shape with two little 'horns' to it at the bottom? But that apparently single central section is actually made up of parts of all six of the basic units of interlace in the layout. By introducing three breaks, you will give it the two 'horns' and separate it from neighbouring units.
It will all make sense!
Here’s the basic interlace layout we’ll start with, in pencil:
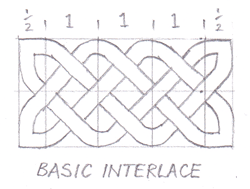
You may recognise it as the same structure you drew earlier for the interlace page: three squares by two, starting with right-handed crossed-cords-in-squares, then with the rest of the crossed cords filled in.
I’ve shown all the edge-curves joined up so you can see what’s going on, but you’ll probably be better off eventually just working with the central section of the interlace filled in and the edges unfinished.
The basic interlace must be correct (over-and-under) before you start. You'll need an eraser, too.
Let's introduce three breaks into the pattern – nothing too fancy:
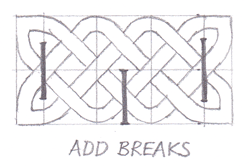
(Note that the breaks to left and right are on a grid-line, so they end halfway into a square; and the break in the middle bisects a square, so it ends on the next grid-line.)
Now, rub out the pencil lines which show cords crossing immediately under the breaks. These cords, instead of crossing, are going to turn and join each other.
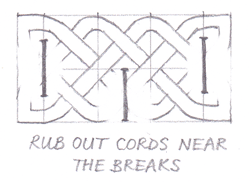
Finally, re-shape the lines carefully round the breaks, keeping the curves smooth and sweet, and tucking the cords in as close to the corners as possible:
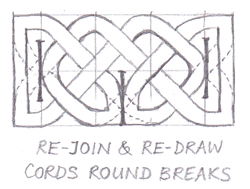
Voilà! By looking at your new Celtic knotwork design, I hope you can see how that round, complete-looking central knot is a kind of illusion. It's actually six units of interlace, massaged into a Celtic croissant.
At the ends of the knot, you now have a plain cord running top to bottom where the break prevents the cords from weaving in. This adds to the illusion that the central knot 'happened' as a complete single unit rather than as a compound weave.
If you wanted a repeating Celtic knotwork design from this, you'd simply take off the half-squares on either side and repeat the central 3X2 block, with one of the 'tall' end-breaks between each block.
Continue to Part 5 of Celtic knotwork art: INKING IN
Go back to Part 3: BREAKS MAKE PATTERNS
Go back from 'Celtic knotwork design' to Calligraphy Skills homepage