How to draw bubble letters

Why does a calligrapher need to know how to draw bubble letters? They're fun. They're easy. You can draw them anywhere with just a pencil, or a biro, and a little colour. They're useful for signs, doodles, cartoons, posters, birthday cards and so forth. And they're very simple to decorate.
So here is the Calligraphy Skills 'How to Draw Bubble Letters' free online tutorial. This is my own alphabet design. It shows how to draw bubble letters based on a circle, so they really BULGE. It's basic, but it works.
The instructions are not in alphabetical order but proceed more or less from the simpler letters to the more complicated. The images come first, then notes containing more information on how to draw the bubble letters. I've also grouped letters according to similar forms. If you start at the beginning and work through, you’ll learn the whole Calligraphy Skills bubble alphabet. Or just find any particular letters you want and only learn those.
The order is:
(this page) O Q I ... D B ... C V U ... A H
(page 2) S Z N ... E M W ... P R F
(page 3) Y T ... K L X ... J G
How to draw bubble letters, step by step
You’ll need:
• a pencil – I use a 2H for construction lines and a 3 or 4B for final outer lines, and for shading if I'm shading in pencil
• a good eraser
• paper
• some kind of colour if you want to colour the letters in – if so, make sure your paper is high enough quality to take it because it’s frustrating to draw the perfect alphabet on cheap photocopy paper and then find your watercolour paint is running and blotching all over the place or the chalk pastel won't stick
• compasses (if you are a precise-minded type) to draw the circles, or else something circular to draw around or trace ... I began by drawing round a small plastic pot-lid but the advantage of using compasses is that the point leaves that little hole so you can always easily find the centre of the circle as a starting-point for constructing the rest of the letter
Ready? :-) Start by lightly drawing a circle in pencil. This is your 'construction circle'.
It's useful to mark a small dot in the middle of the circle, as a guide while forming many of the letters.
And here we go with O and Q:
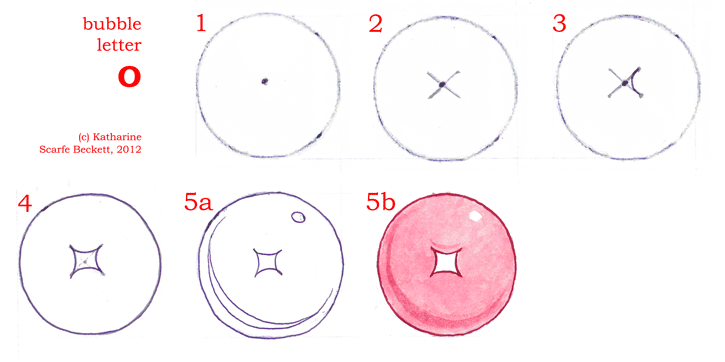
O, Q
Both these are already mostly drawn for you in the form of the original circle. For both O and Q, find the middle of the circle and on it draw a small, regular X. Join the points of the X with short, curved lines bulging inwards. That’s O. Now, for Q, sketch in a small circle towards the bottom right of the letter (directly opposite the bottom-right point of the little 'star' you drew in the middle). It should straddle the outer line of the original construction circle. Erase the inner pencil lines. Black-pencil or ink over the final lines, inside and out. You’re done. Easy-peasy. Next!
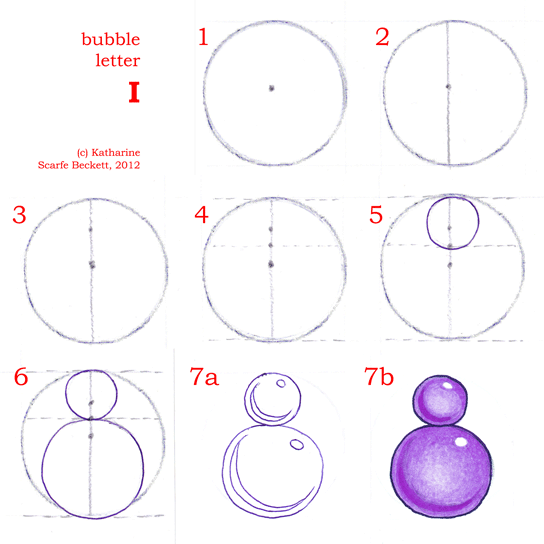
I
I is also based on the simple circle but it's slightly different from O and Q: it's two circles, a large one at the bottom which should be about two-thirds the size of your original construction circle, and a second littler circle on top. (I started with a different way of drawing 'I' which you can see in the illustration above. It worked for a while but eventually I decided it looked too fiddly and not bubbly enough, and so I redesigned the letter for this simpler form.)
On to D and B!
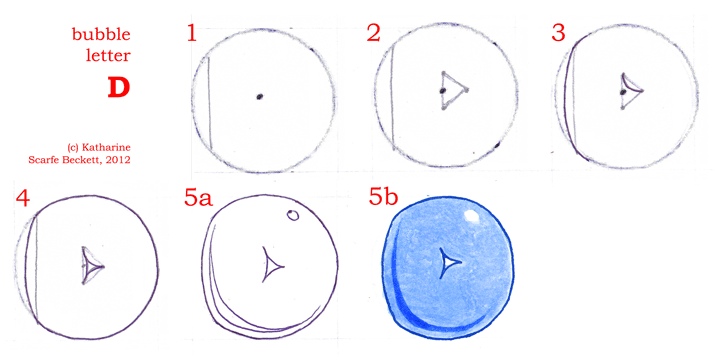
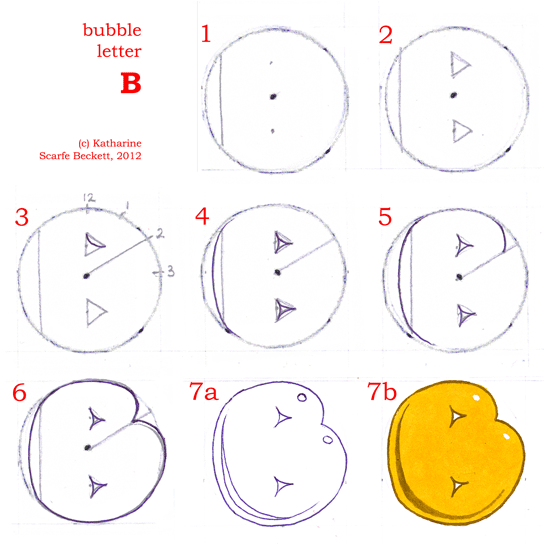
D, B
These two letters have straight backs in most ordinary alphabets. After thinking for a long time about how to draw bubble letters with long straight lines in them, I decided that the best way to help the eye recognise the letter is to use a long shallow curve instead. So first draw in the straight back as a vertical line, and then draw a curve that falls exactly halfway between that vertical and the full-circular curve of your original construction circle.
Note that the counter or white space inside these two letters is based on a triangle, unlike O and Q which use a four-sided lozenge. This helps the eye understand the underlying form of the letter and recognise it for easy reading even though it is distorted towards a circle.
The rest of the details (I hope) should be obvious from the illustration. The 'B' is not as complicated as it looks. You could estimate by eye to draw in the short diagonal line that divides its two lobes. I show a simple way of finding a similar position for it repeatedly, in case you are drawing multiple 'B's in the same stretch of text. Imagine the circle is a clock-face, and draw the line from 2 o'clock to the centre.
Ready for C, V and U? They use divider-lines in an even more exciting way than B. If you really want to know how to draw bubble letters, then you're about to learn a very interesting technique ... Oh, the suspense :-)
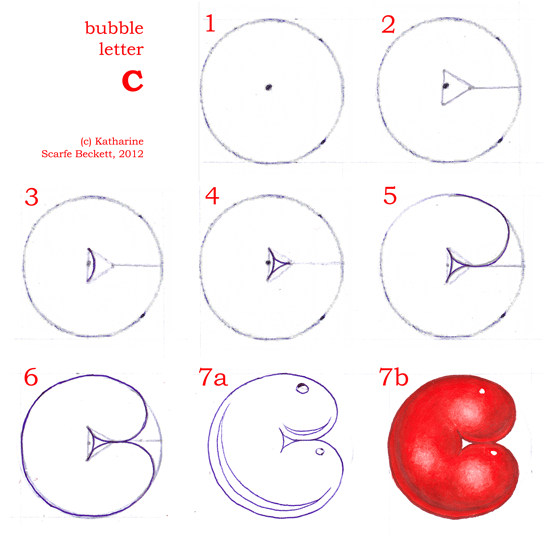
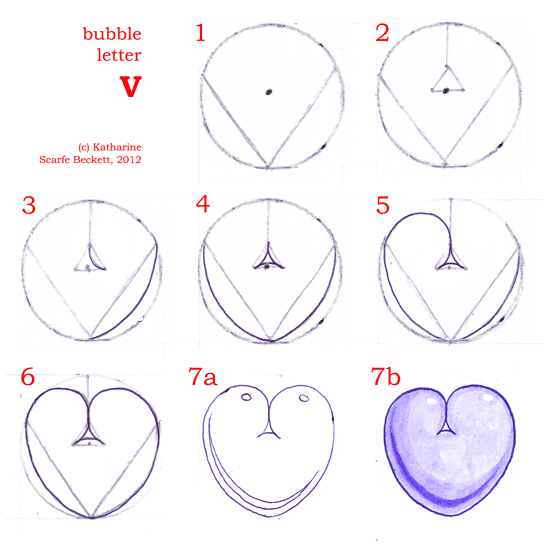
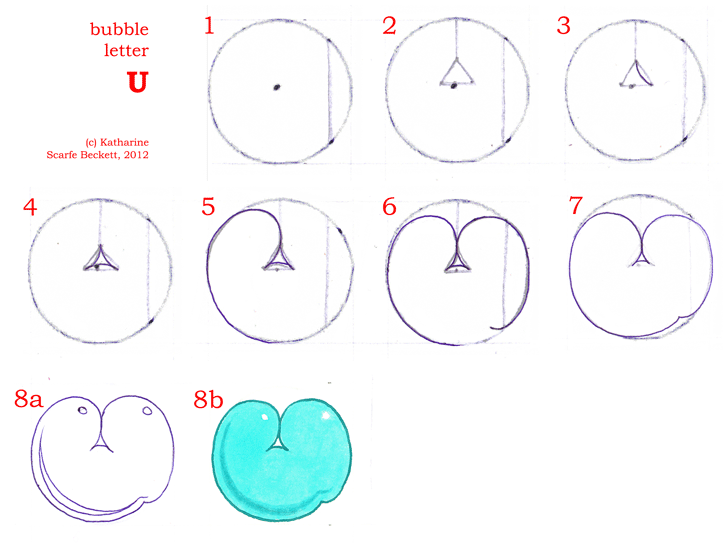
C, V, U
(By now you will have noticed that my images are different sizes according to whether there are three or four letterforms in the rows. Yes it is accidental. No I have not had time to correct them all and re-upload them. It was late at night in Photoshop, I was tired, etc etc. Sorry.)
The way the dividing lines work in these letters is important to grasp so that you know how to draw bubble letters that look fully inflated but not squashed. When you draw the curves from the inside triangle, make sure (a) that they extend smoothly into the rest of the letter and (b) that they only just touch the dividing line at one point. If they run along the dividing-line, they will make the letter look pressed-together, and a bit odd. If they don't touch at all, the letter won't look as round and bubbly as it could.
Of course, if you want to alter that rule deliberately to create your own effect for a new alphabet, that's different. Go right ahead!
The C has some ersatz reflected-light highlights added – the paler patches opposite the highlights, on the 'undersides' of the curves. Crude, but I sort of like it.
In theory you could create just one letter, a kind of slightly pointy curvy thing with no right-hand 'leg', that would stand for both 'V' and 'U', the way the Romans did with monumental and rustic capitals. I prefer to have two separate letters since this is a modern alphabet.
Now for A! And H! Aha!
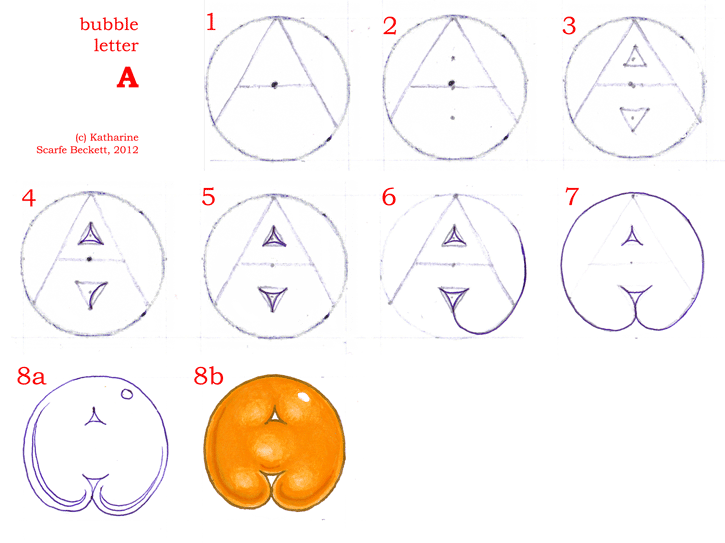
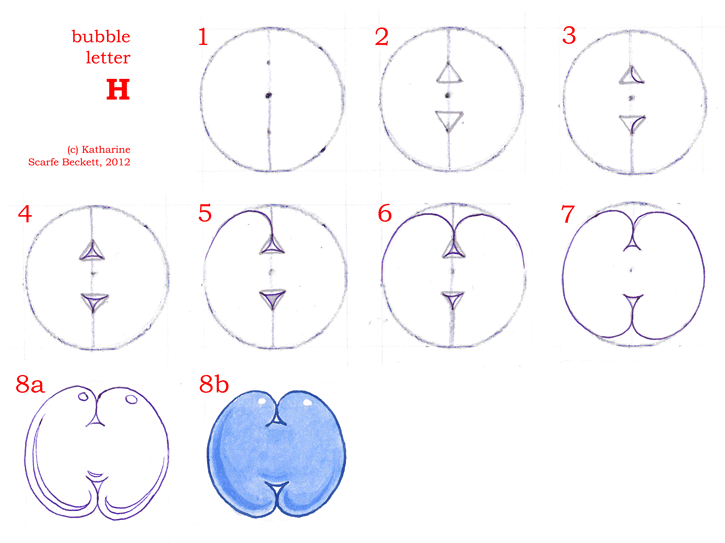
A, H
(More reflected-light highlights on the A. I was having fun.)
These two letters are fairly simple to work out once you have grasped the basic principle of dividing the circle and drawing internal curves that just touch each other. As you can see, an H is just an A with another dividing line at the top.
Based on D and B, you might think it would make sense to use long, shallow curves to represent the longer straight lines of 'A' and 'H', instead of letting them follow the original fatter curve of the construction circle. However, I think these two letters remain very recognisable with circular sides, and bubblier that way. As it's all about how to draw bubble letters, not totally consistent letters, it seems best to keep it simple.
Next up on the second page are S Z N ... E M W ... P R F.
(Y T ... K L X ... J G are on the third page.)
A little background
I didn't originally intend to write a tutorial on how to draw bubble letters. However, I just couldn't find a free bubble alphabet online that I really liked for the site. 'Bubble' to me means the letter has to be a round shape, practically spherical. Like a bubble!
So I started drawing my own letters to show visitors what I meant ... then I noticed some useful rules emerging for how to form similarly-shaped letters ... next thing I knew I'd designed my own version of a bubble alphabet and was drawing little step-by-step instructions for visitors to show them how I'd done it and how they could reproduce it (and redesign it of course).
The final forms above are all presented fairly similarly (ie one colour per letter, highlights top right, crescent-shaped shading) so you can see that it's a coherent alphabet. However, I've varied the colours and textures of the shading. Partly that's to help give an idea of how the letters look using different effects. Partly it's to encourage you to colour your own the way you want them to look. And it was more fun that way, too :-)
Designing your own alphabet is a lot of fun. I recommend it! Feel free to use this page as you wish for personal and educational purposes, and of course use it to inspire your own alphabet designs. Please don't sell the instructions or images. As their creator I intend for them to be available for no charge.
Go to 'How to Draw Bubble Letters 2' (S Z N ... E M W ... P R F)
Go to 'How to Draw Bubble Letters 3' (Y T ... K L X ... J G)
Return to 'Bubble Letters' (general overview, and other links)
Return from 'How to Draw Bubble Letters' to the homepage