How to draw Celtic knots
Another valuable calligraphy skill!
If you’d like to know more about how to draw Celtic knots for use in decorative borders, illuminated letters etc, these pages show you:
• how to draw the basic unit which makes up all Celtic knots
• how to join cords to ‘knot the ends’
• how to repeat units to create twists, plaits and weaving (2, 4, 6 and 8 strands)
• how to create all kinds of patterns in your knots
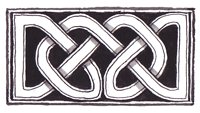
Here’s the knot I’ll be using as an example. As you work through, you’ll learn a lot more than just this one knot! You'll practise the skills you’ll need so as to know how to draw Celtic knots of your own. You should then be able to design your own page borders, knot decorations, illuminated letters etc.
Materials
You will need basic art materials:
- Pencil, paper, and eraser for the working drawings.
- A small ruler for measuring out the squares.
- Black (or colour) for filling in your Celtic knot design at the end.
The underlying rules
When you learn how to draw Celtic knots, you’re actually learning how to plait on paper. All Celtic knotwork or interlace is based on the structure of a plait with (usually) two, three, four, five or six strands. By interrupting this plait in certain ways, linked knots are created.
The one thing all plaits and weaves have in common is crossed cords (or crossed strands, cables, strings, lines, strips etc). Cords cross each other, over and under, to make all plaits and interlaced patterns.
So here’s the first secret – the real starting point for how to draw Celtic knots is not a plait but a simpler unit – the building block of all Celtic knots: two crossed cords in a square.
How to draw Celtic knots 1: CROSSED CORDS
The basic, underlying unit is ‘two crossed cords in a square’. Here is what it looks like:
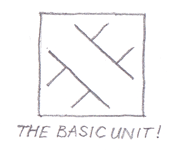
Notice which cord is drawn on top. It’s the one starting top left and coming down to bottom right. That makes this unit a ‘right-handed cross’. It’s called ‘right-handed’ because it looks like your two forefingers crossed with the right hand on top:
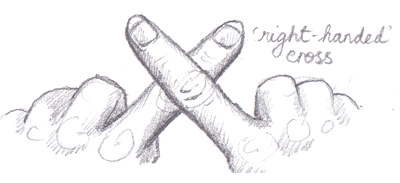
If the other cord were on top, it would be a ‘left-handed cross’. Both are necessary. All Celtic knotwork consists of lines of right-handed crosses alternating with lines of left-handed. Together, these construct the ‘over-and-under’ of a woven design.
We’re going to start by using right-handed crossed cords, and add the left-handeds later.
Here’s some good news. If you can draw these two crossed cords in a square well, you can learn how to draw Celtic knots:
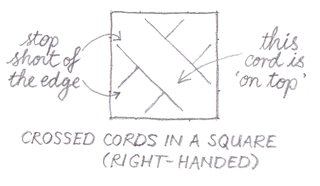
Drawing these crossed cords well means:
• Get used to stopping your lines well short of the box edges. This will be important later on. (I have actually drawn mine rather too long in these examples, to emphasise the 'cord' look.)
• When you draw the two lines which form each cord, keep them parallel and the same length.
• Make both cords middling fat (for the moment) and the same thickness as each other. A good guide is to imagine each line originating from a point one-quarter of the way along each edge of the square, like this:
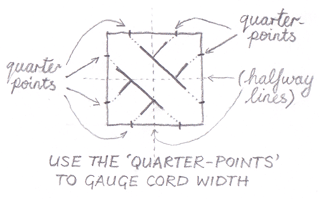
So, you’ve got the idea of the crossed cords? It’s the first principle you need to know well: these uniform Xs in boxes are a fundamental building block from which you can create all the knotwork you like.
Yes, I know it doesn’t look much like how to draw Celtic knots … yet :) But it will, very soon!
Continue to ‘Part 2 --JOINS MAKE KNOTS’
Go back to ‘Celtic knot designs’
Return from How to draw Celtic knots to homepage