How to draw Celtic knotwork 3 – REPEATS MAKE INTERLACE
Happy so far? :-)
This third page on how to draw Celtic knotwork depends on your first knowing about crossed cords as the basic unit and also how to join cords to finish off a knot.
Now for how to make your Celtic knot literally as long as a piece of string.
The simple crossed-cords-in-a-square unit repeats very easily to create long twists, plaits or sections of interlace.
Here’s the basic two-crossed-cords-in-a-square unit again:

And here is the same, basic unit of the Celtic knot joined up with another, identical unit placed alongside it:

Notice that when you are repeating units like this, you don’t need to add any extra space in between in order to join cords (unlike the ends of knots). You just ‘scoop’ the line round and it joins up. (Joining cords to finish off the ends of knots is covered in more detail back in the
second page of the tutorial.)

So here is the first piece of Celtic decoration that can be made. It's the basic unit joined with several others to create the simplest possible version of a plait – a two-strand twist:

It’s pretty enough and it makes a nice border; and it’s used in the original Celtic manuscripts to fill narrow, pointed spaces, as in this example from the Canterbury Codex Aureus:

But it doesn’t look much ... a bit like watching someone juggling two balls. And it gives the impression you could just unravel it with a flick of the wrist.
Nevertheless, this two-cord twist is a vital step on the way to learning how to draw Celtic knotwork of far greater scope and ambition.
You can see that some of the same rules apply for repeating a pattern that we saw in joining cord-ends. It helps if you don’t draw the original crossed cords too close to the edges of the square they sit in. That way, you can draw smooth curves to join the cords, without kinks or irregularities.
Doubling up a two-strand twist
So far, you may feel that we have twisted lots of bits of string into nothing very impressive in terms of how to draw Celtic knotwork. But what happens if we repeat the same simple crossed-cords unit upwards as well as along?
What you're doing here is running another twist along the top of the one you've already got. Then, you're simply extending the lines of the bottom row of crossed cords so that they meet up with -- and become -- cords in the top row.
At the edges, cords turn back into the plait again. In the middle, cords keep going in straight lines if they possibly can.
Like this:

By golly, it’s a four-strand plait! – a section of woven border! Why, that’s almost all you need to know about how to draw Celtic knotwork!
If you don’t find that exciting … well, fine.
To be serious: this is also the time to notice one very important point which applies to any ‘how to draw Celtic knotwork’ method:
What goes over must go under; what goes under must go over.
A cord which has crossed over the top of another cord must go under the next cord it encounters, and vice versa. It’s a strict rule for interlace patterns.
Remember you drew your original two-crossed-cords-in-a-square as right-handed crosses? Now where your cords join upwards they must form left-handed crosses staggered in between the original right-handed crosses. Over and under, over and under is the unvarying rule.
Take another look:

So, whenever you find yourself wondering how to draw Celtic knotwork, use the following rules.
If crossed cords are right-handed in the middle of a square, they are left-handed where four squares meet up (and vice versa, if they’re left-handed in the middle of a square, they’re right-handed where the corners of the squares meet).
Another way of looking at it is that if the cords cross right-handed along the edge of a plait or pattern, they’ll cross left-handed ‘up a level and along one’, and they’ll cross right-handed again on top of that.
If you haven't already done so, now's the time for you to demonstrate how to draw Celtic knotwork ... well, interlace, anyway.
First, draw six squares in a block of three by two:

Add two half-squares down the left-hand and right-hand edges, in which to join up the ends:

Then draw six right-handed crossed cords, one in each box, remembering not to go right to the edges. (If you’re not sure of this element of Celtic drawing, see the [earlier] tutorial page):

Then draw the left-handed crossed cords that go in between, on top of the places where the square boxes meet up:
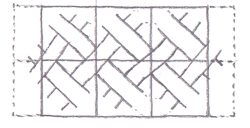
Then join up all the ends along the edges by drawing smooth curves between the outside lines and then smaller curves between the inside line. This element of Celtic drawing governs the final ‘flow’ of the knot. Keep the cord-width constant:

Then join up the ends in the half-squares. The top cord in the top row joins the top cord in the bottom row; the bottom cord in the top row joins the bottom cord in the bottom row. Like this:

Check your cords are all going over-and-under-and-over-and-under. If not, check the earlier steps for where the drawing went wrong, and correct it, or start again.
If all’s well, colour in the little spaces between the cords, and rub out any construction lines (the lines of the original squares):

Congratulations. You have (I hope) just produced a piece of genuine Celtic drawing. It’s not quite patterned knotwork yet, but it’s very close indeed, and it's authentic Celtic decoration.
There's one important page left -- on how to draw more interesting Celtic knotwork patterns by introducing breaks into the weaving.
(And there's one more after that on inking and outlining techniques which you might also find useful.)
Continue to Part 4 of How to draw Celtic knotwork: BREAKS MAKE PATTERNS
Go back to Part 2: JOINS MAKE KNOTS
Return from 'How to draw Celtic knotwork' to homepage