Drawing Celtic knots 2: JOINS MAKE KNOTS
I hope that last page about the crossed cords was clear; it'll be used again soon.
For drawing Celtic knots, the next thing you need to know is that you can make the ends of crossed cords turn and join up with neighbouring cords. When they join, they ‘seal off’ that section of the interlace. This is the basis of all Celtic knot patterns. (More on this later.)
It’s also the way you tie up the loose ends of a panel or knot at the end of the space you want to fill.

For example, look at the two ends of the knot to the left.
You can see that the 'in-and-out' section of the knot pauses where the cords from the top and the bottom join together tidily in a squared-off loop.
So here is what this page is about: how to join up the ends of interlace to make self-contained knots.
In order to join cords to finish off the ends of a knotted section, you must create a special space in which to do so.
This space is a new half-square which you attach to the side of the box where you want the join to occur.
This is a very useful rule to remember if you’re drawing Celtic knots to fill a panel, border, letter etc: any junction between cords at the end of a section of knotwork requires a space one-half the width of the square which the cords cross in.
To put it another way: the square is the basic unit in which cords cross. The half-square is the basic unit in which cords join to make knots. Squares for weaving. Half-squares for tying up the ends.
Here are the crossed cords again, now joined up in the half-square on one side:
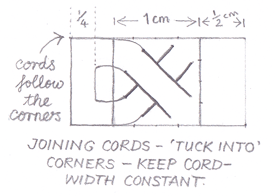
Notice that the cord-line is quite angular where it tucks into the corners. This is often, but not always the case in Celtic knotwork.
And here is the basic unit again, now joined up on the other side too:
It’s not a very complicated knot, yet – not much of a knot at all – but it is assuredly an authentic scrap of Celtic ornament, soundly constructed!
Tips:
• Keep the cord thickness constant. This is important in drawing Celtic knots, and not always easy. It helps to draw the outer line (nearest the border) first, then the inner.
For the long verticals at the end, remember the cord thickness is roughly a quarter of the original box width, so roughly one half of the end-box is about right.
• Draw smooth curves. (This is easier if you draw your crossed cords quite short to start with -- even shorter than mine.)
• Make the cords go right up to the edge of the space you’re working in. Merge the outer curve of the cord with the square outline.
Recap: Crossed cords as the basic unit was the first useful principle. Join ends for knots is the second.
There are only really two more fundamental principles to grasp in drawing Celtic knots!
Continue to Part 3 of how to draw Celtic knotwork: REPEATS MAKE INTERLACE
Go back to Part 1 on how to draw Celtic knots: CROSSED CORDS
Return from 'Drawing Celtic knots' to homepage